
A Cast Without a Skeleton
Notes from rigging BunRun's kitchen cast, where nobody has a normal skeleton
BunRun is the mobile game we're building at KREATURA. Its world is a kitchen, and its cast is what you'd expect to find there: a rolling pin with a grudge, a plate with arms, a blender that walks on four legs, and a robot hero carrying a steam oven on his back.
Rigging tools assume a human. Auto-rigs, retargeting presets, naming conventions and the muscle memory of every tutorial all expect a spine, two arms, two legs and a head on top. Our characters break that assumption one at a time. This article goes through what we built for each of them and where it went wrong. It also covers the few rules we'd keep for the next character.
A note on how the work was done. The rigs were built in Blender, but most of the clicking wasn't done by a person. Claude drove Blender directly through an MCP connection: it wrote Python, ran it inside the open file, looked at the result and tried again. Dawid directed it, judged every pose and caught the mistakes. Several of the lessons below are mistakes an AI made, and Dawid caught them by looking.
The Rolling Pin: A Body That Is a Spine
The rolling pin has no torso, neck or hips. It's one wooden cylinder with stubby arms at the handles, two short legs and a face carved into the side. Every pose it needs comes from bending that cylinder.
So the body is the spine. Two bendy bones run from the centre out to each handle, eight segments each. A bendy bone curves smoothly along its length instead of hinging at one joint. A single control sits at each tip. The spine halves stretch toward those controls, and the controls also act as the curve handles, so moving a tip both lengthens the body and bends it. Sixteen segments give a smooth arc with only two things for the animator to grab.
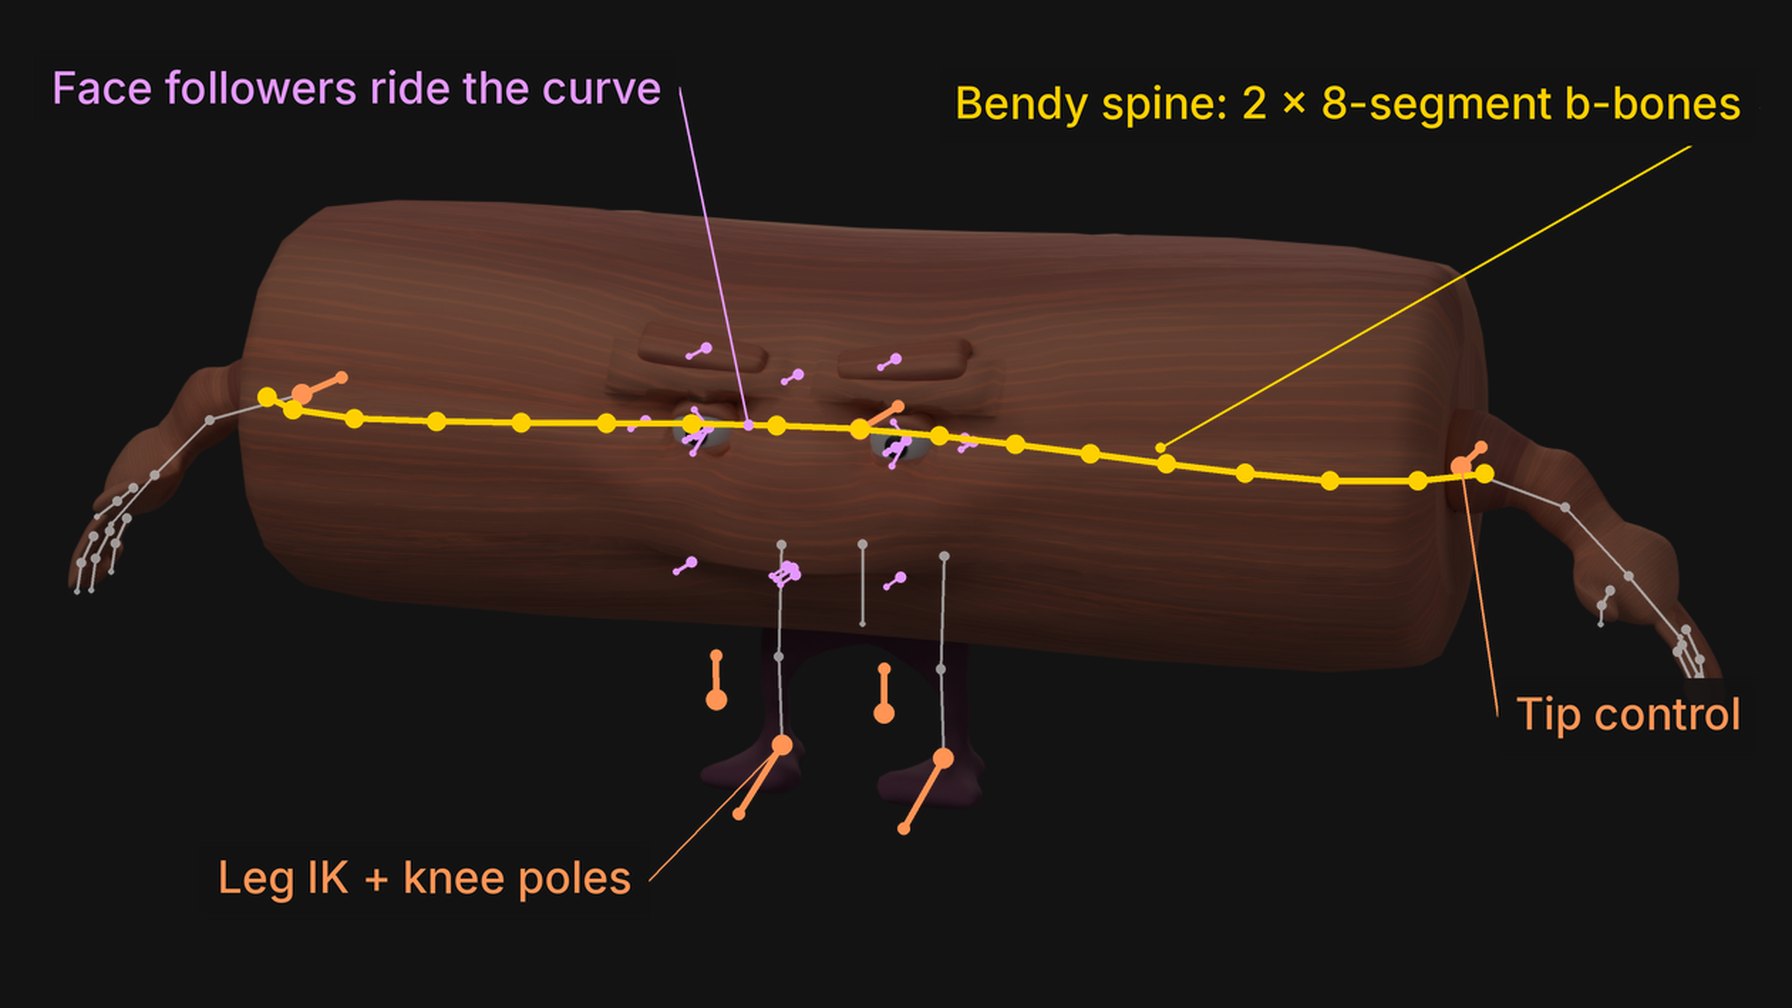 The rolling pin rig: 69 bones, but an animator mostly touches the two
tip controls, the body ring and the feet.
The face caused the first problem. Eyes, brows and lids are separate objects, and they have to stay glued to a surface that keeps bending. Parenting them to the spine directly didn't work, because a bendy bone's segments aren't bones you can parent to. The fix was a pair of helper bones that copy the curve's transform and follow the bendy segments. The face hangs off those helpers. The brows also get a shrinkwrap constraint that keeps them sliding on the wood at a fixed distance instead of floating off it.
One bug cost far more time than it should have. Faces split open along the legs whenever they deformed, and the vertex weights looked fine. The real cause was in the mesh: 376 mirrored vertices along the legs' centre line had never been merged. Welding them took the legs from 1,375 vertices to 999 and the splits disappeared. The arms had a related problem: a negative scale on one axis that flipped their normals and broke weight mirroring. We now check for both before anyone paints a single weight.
THE SAME RIG, THREE STATES
ONE SPINE, TWO CONTROLS
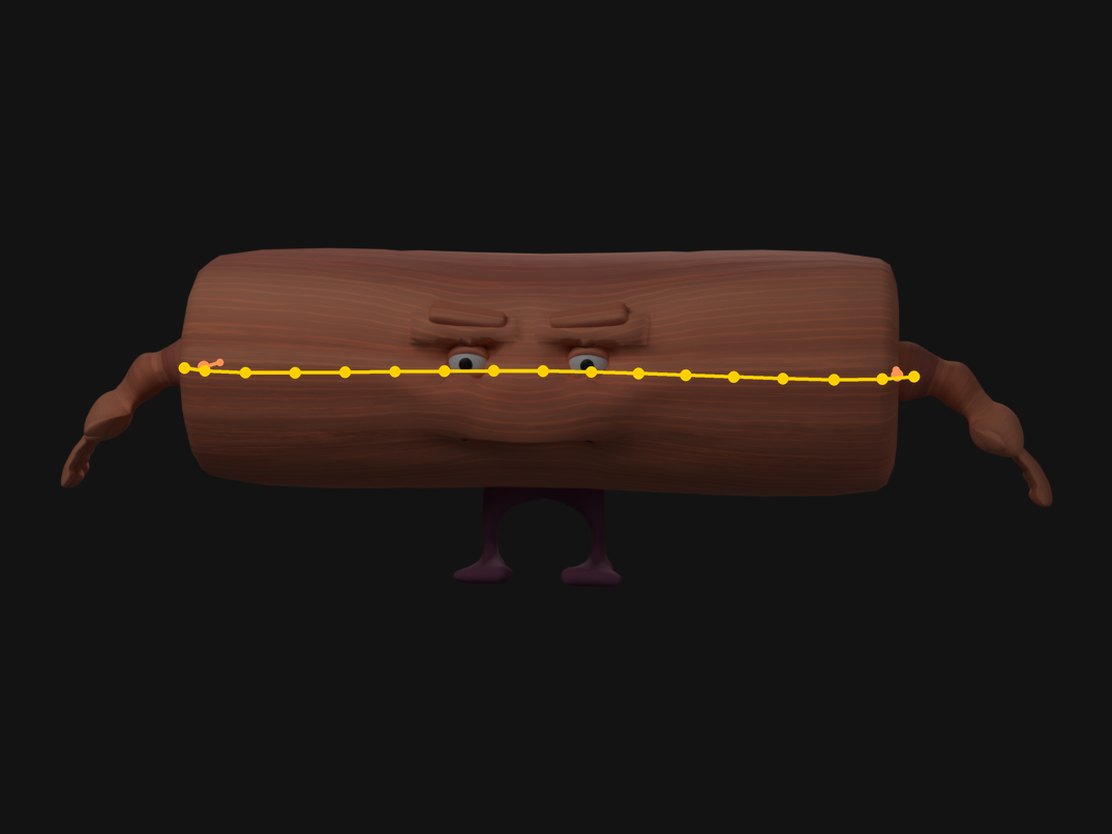
REST
Both tip controls at rest. The spine runs straight through the body.
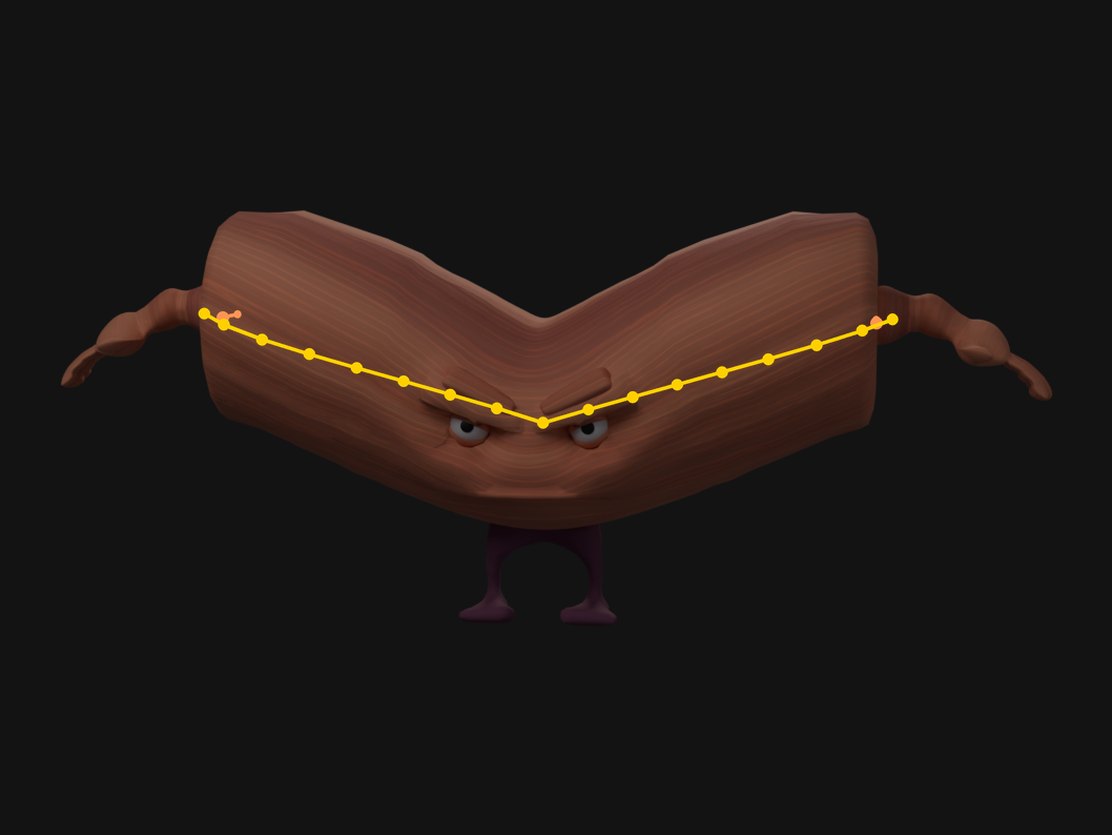
BEND
Both tips raised. The body folds and the face follows the curve.
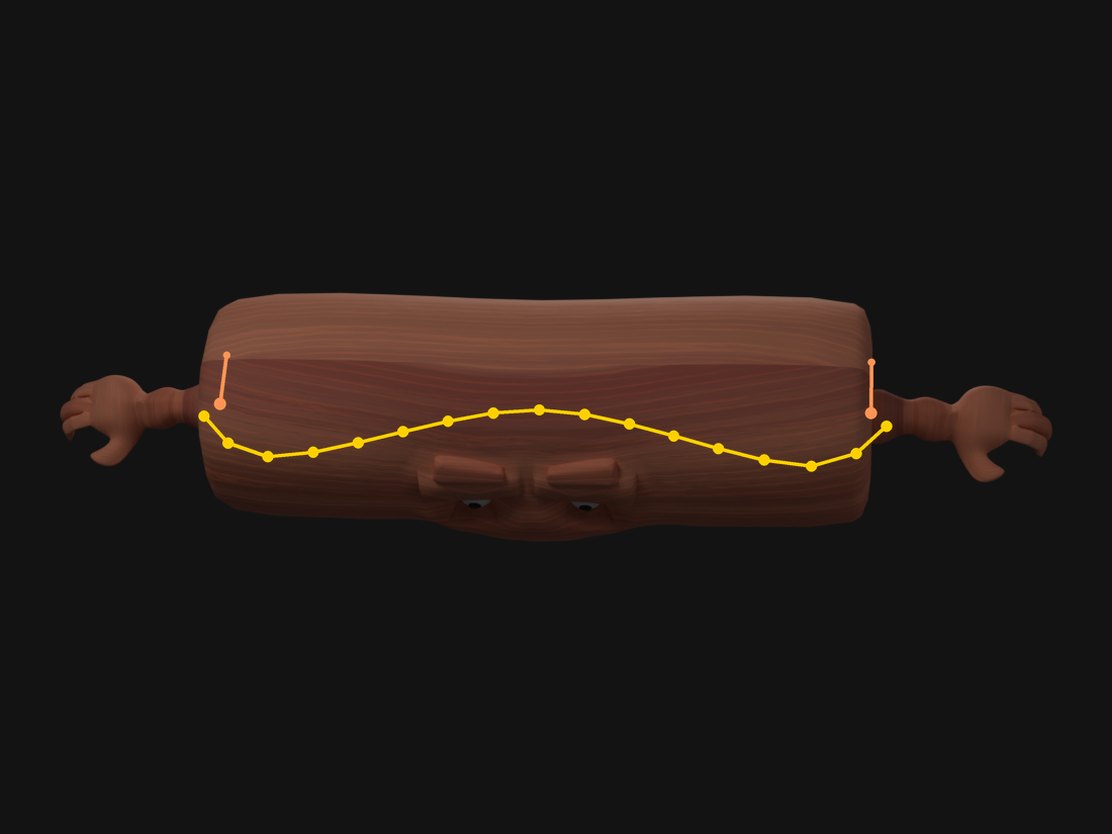
ROLL
Halfway through a turn. The whole body spins around its own axis.
Rolling Is Geometry, Not Animation
The rolling pin's big moment is a set piece: it wakes up on a cutting board, rolls forward twice and pops up onto its feet. Spinning a cylinder sounds trivial. It isn't, because a character rig spins around its root bone, and the root sits on the floor.
If you rotate around the root, the body swings through the floor like a wheel nailed to the ground at its rim. To roll, it has to turn around its own centre axis, which sits 1.654 units up. So the root is keyed on every frame of the roll. As the angle θ grows, the root shifts by H·sin θ sideways and H·(1 − cos θ) up, which cancels the swing and leaves pure rotation around the axis.
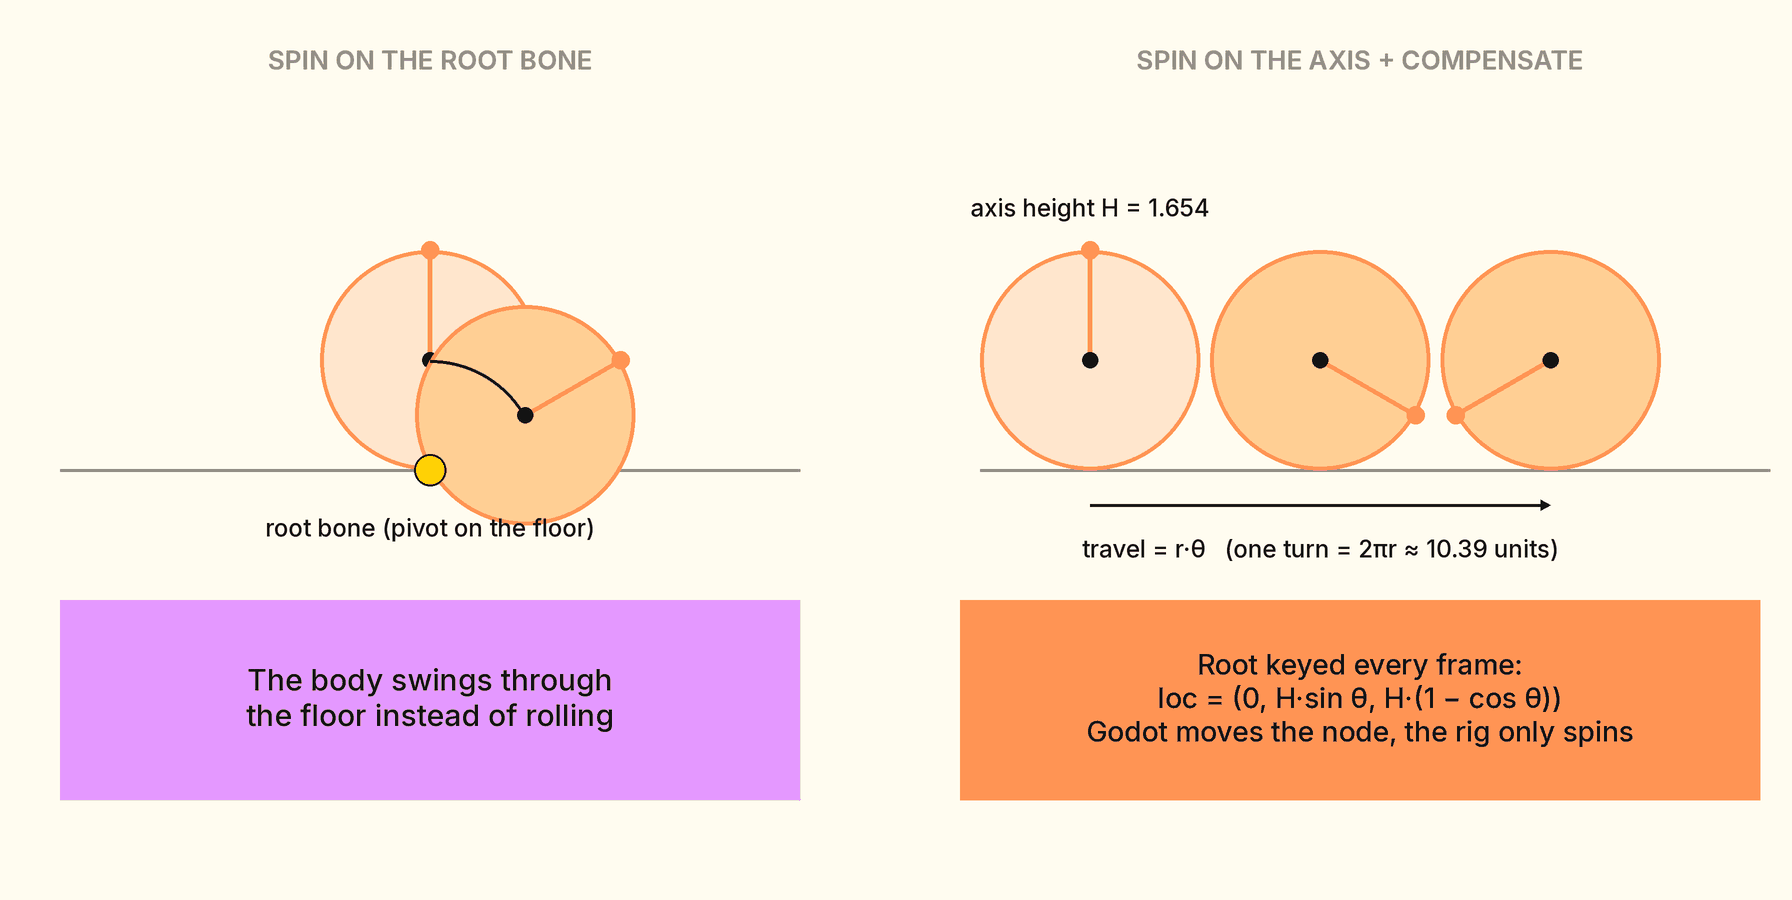 Left: rotating around the root bone. Right: rotating around the axis
with per-frame compensation, while the game engine provides the travel.
The rig spins but it doesn't travel. The forward motion lives in Godot, where the set piece slides the character node along its path at exactly the distance a real roll would cover: 2πr, about 10.39 units per turn. The two clocks line up, so the wood never slips against the board. Keeping motion in the engine and rotation in the clip also means designers can move the set piece without re-animating it.
The HugeMixer: Which Way Is Left?
The HugeMixer is a blender jug on a motor base with four legs and two long bendy grabber arms. Its armature is rotated 90°, so Blender's Front view shows its side and its real front is seen from a side view. Bone names follow the character's own sides, as they should: .L is the mixer's left, which is on your right when it faces you. Dawid, describing what he saw on screen, called that same leg "the front right leg".
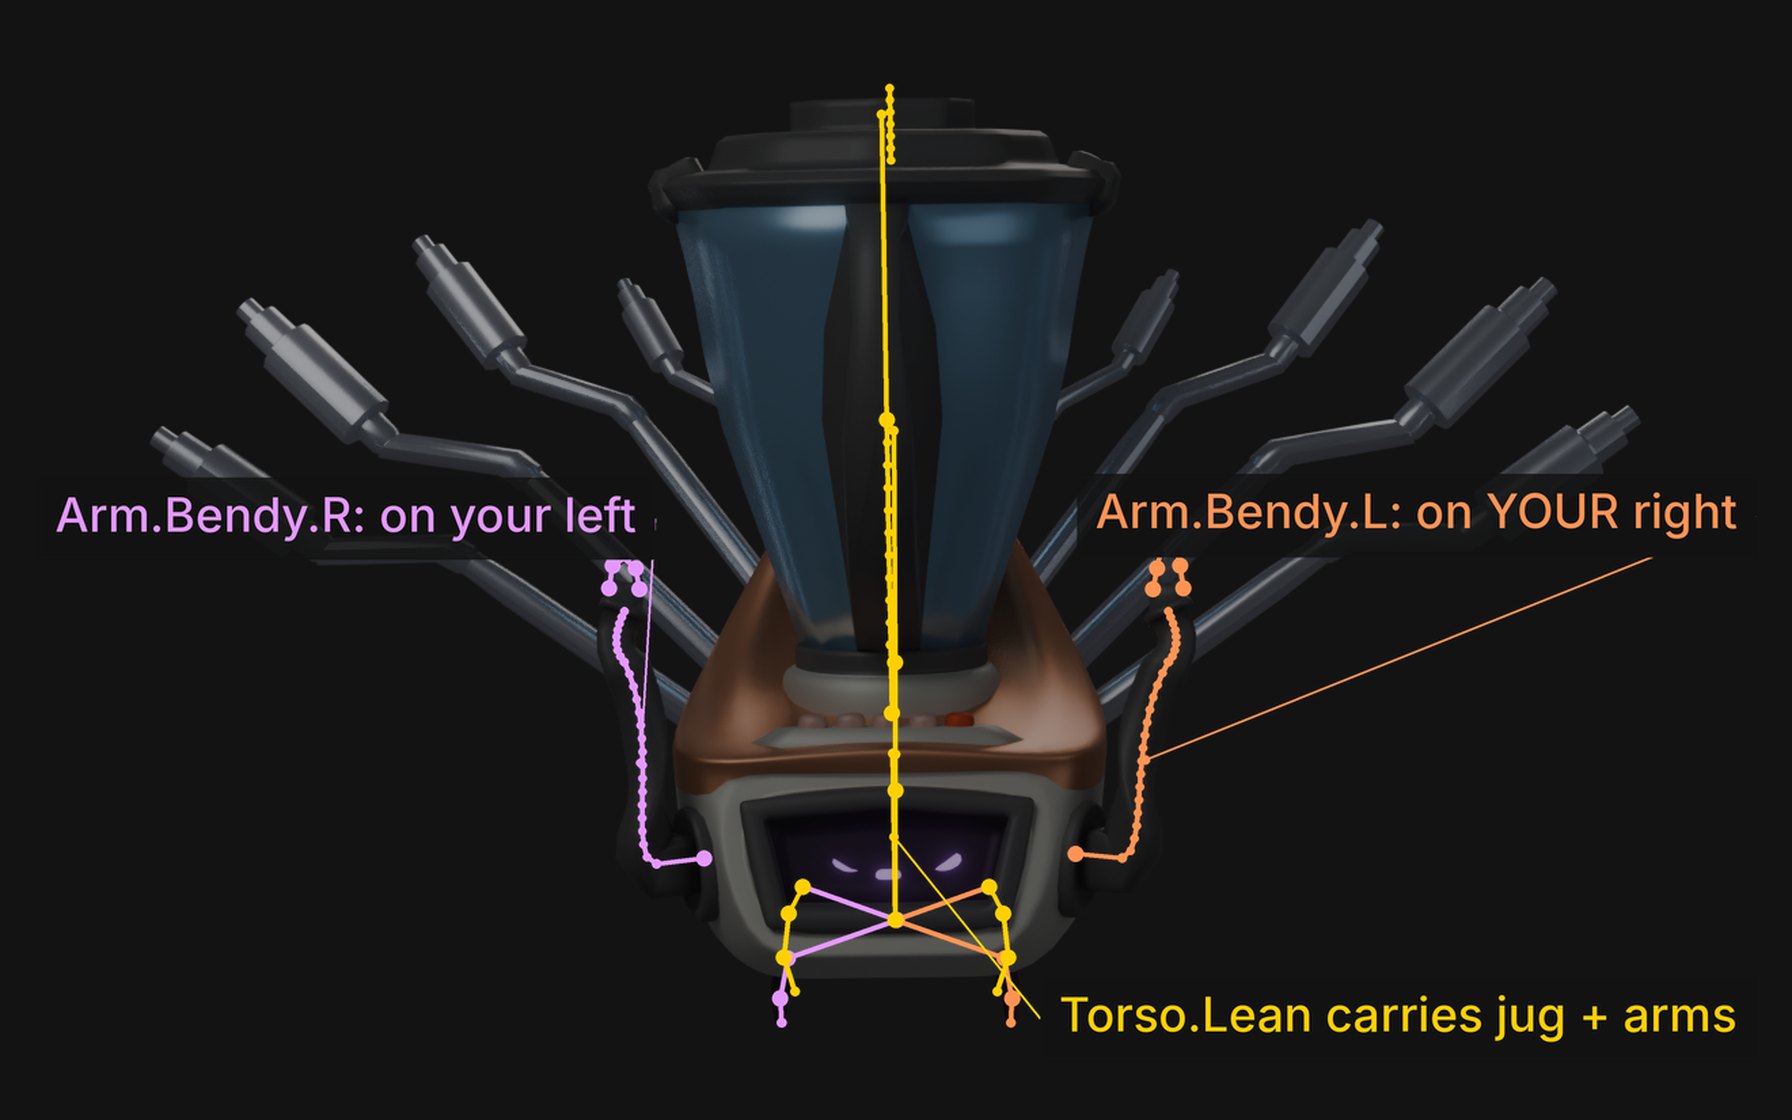 Orange bones are named .L, purple ones .R. Facing you, the mixer's left
side is on your right.
The obvious fix is to rename everything to match the view. We didn't, because Blender's mirroring tools (symmetrize, pose flipping, weight mirroring) all depend on the left/right naming staying consistent with the armature's own axes. Instead we wrote the trap down: a side named from the screen and a side named in the rig are opposite, so "the front right leg" means FrontLeg.*.L. Until that was written down, it caused a misunderstanding every session.
The more interesting fix was the hierarchy. When the mixer leaned forward, parts of the motor base stayed behind, because they were weighted to the static root instead of the leaning torso. In one animation the jug's handle also clipped into the glass. The fix was to move everything that should lean under a single Torso.Lean bone: the base controls, the neck, the jug and the arm roots. The arms' end targets stayed free-floating, so hand motion that was already animated didn't move when the body learned to lean. Named bone collections and a colour palette came last: yellow for the core, green for the torso, orange for the glass, blue and red for each side.
The Plate: When the Names Lie
GobPlate, a ceramic plate with arms and legs, was the first BunRun character to get a full rebuild. Before redesigning anything, we had to understand the existing rig, and its bone names didn't describe the bones.
The bone called Hip is actually the thigh. The two bones called Thigh and Calf form an IK chain that together makes up the shin. An AI that trusts names bends that leg in the middle of the shin, and that's what happened. Dawid's feedback was short: "you're bending his legs wrong." The fix was to aim the "hip" at a solved knee position and keep the "shin" straight. From behind, the knees also have to go out sideways below the rim. A forward bend is invisible from the back, because the legs attach inside the plate.
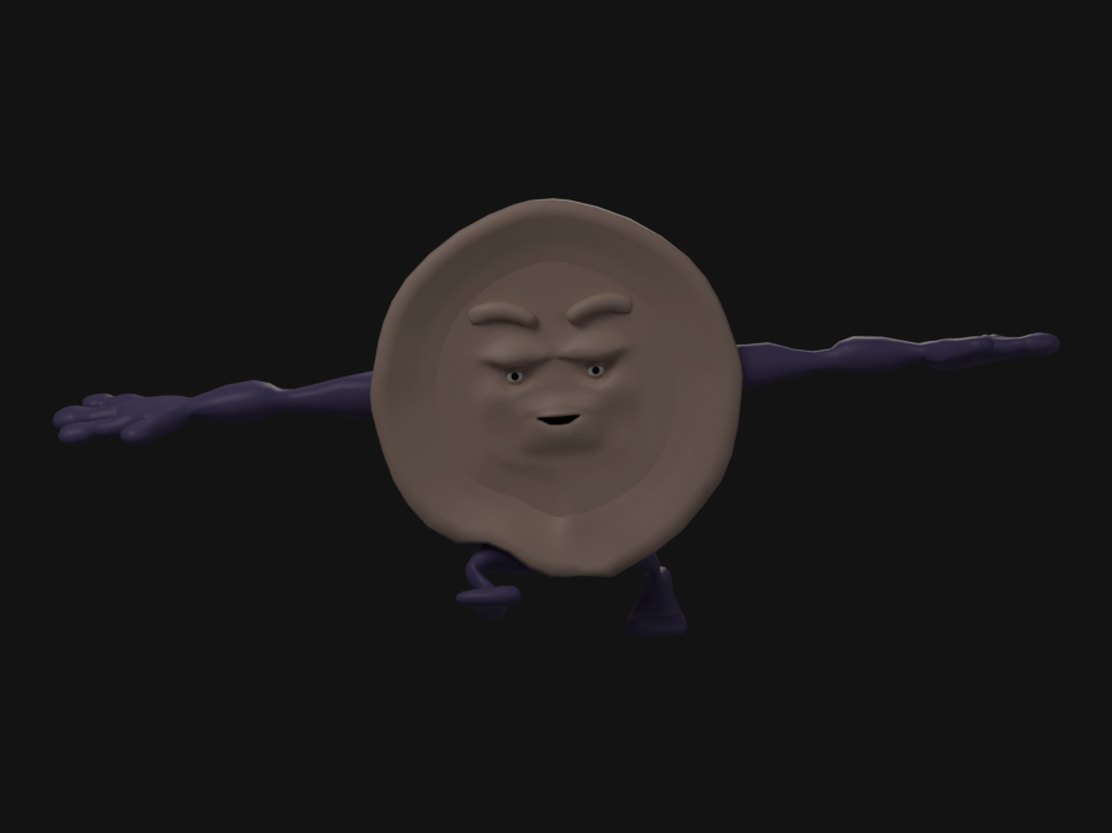 Before: the original model and rig.
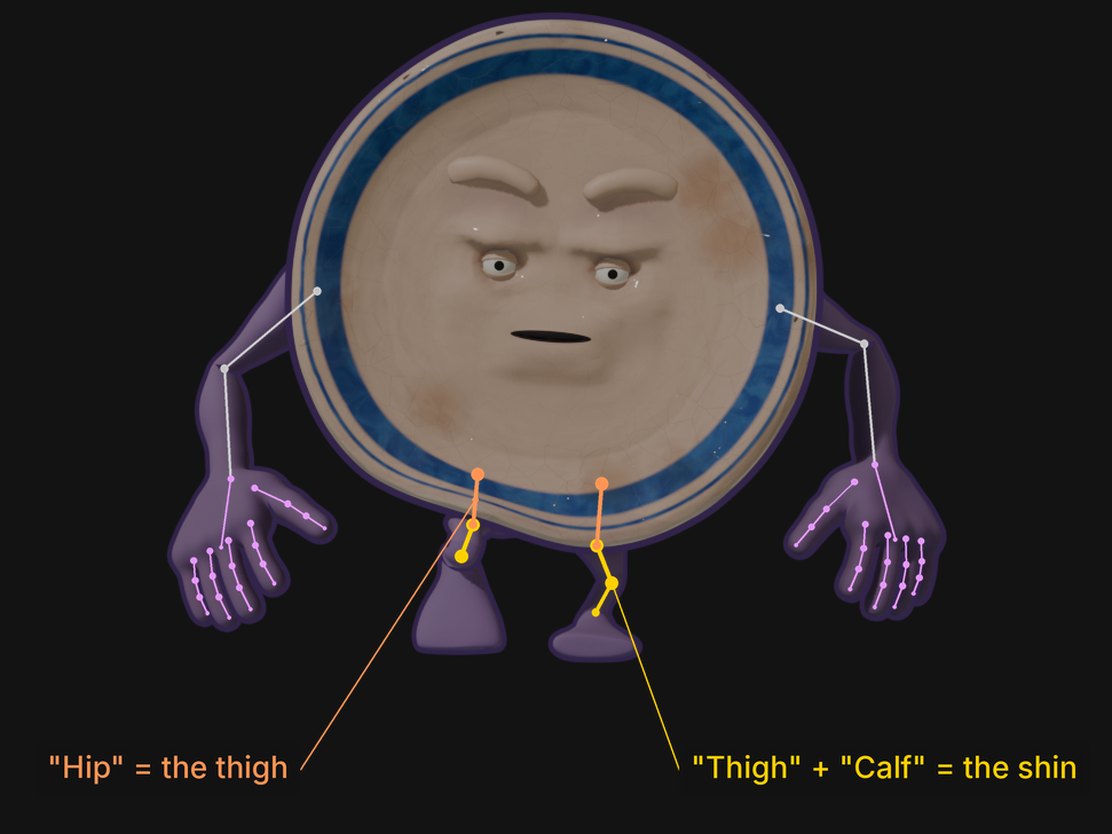 After: rebuilt mesh, five-fingered hands, same bone names, and labels
for what those names actually mean.
Hands were the hardest part of the rebuild. The new hand was built from scratch as a smooth blend of simple shapes. It was converted to a mesh and then remeshed into clean quads that deform well. The first versions looked right at rest and fell apart when posed: the thumb kept tearing away from the palm. Several rounds of adjusting the model didn't fix it, because the model wasn't the problem. Each vertex had been assigned to one digit, and the skin between the thumb and the palm was split down the middle. Switching to Blender's heat-based automatic weights for the hand bones fixed it.
How we reached that answer matters more than the fix itself. Reasoning about rotation axes in text kept producing confident, wrong poses. We went faster once we stopped doing that. Dawid sketched the shape he wanted directly on a review board, Claude rendered candidate poses with his strokes laid over them, and the decision took one look. Dawid's instruction at the time sums it up: stop reasoning about axes and check the posed model visually.
The plate also introduced a rule we now use for every character. It has two tiers built on one rig. The game tier uses simple materials, vertex colour and a screen-space outline, so it runs on phones. The promo tier has 4K textures, glaze and crazing for trailers and stills. One file, one control rig and one animation pass serve both.
The Hero: Borrowing a Human Skeleton
The hero is the one character who is close to human: a robot with a pill-shaped head, long rubber-hose arms, huge gloves and boots. That made a deliberate choice possible. Instead of designing a bespoke skeleton, we built one compatible with standard humanoid animation sets. That gives a small studio a large library of motion almost for free.
The test was the Universal Animation Library from Quaternius, released under CC0. A custom retargeting script turned its clips into 42 actions on the hero's rig. Most of the work was finding out what not to align. The library's mannequin rests in a T-pose and the hero rests with his arms down. Aligning every bone between the two produced permanently shrugged shoulders. Only the upper arms needed their swing corrected. Hip motion had to be scaled by the leg-length ratio of 1.552, or the hero's feet would slide.
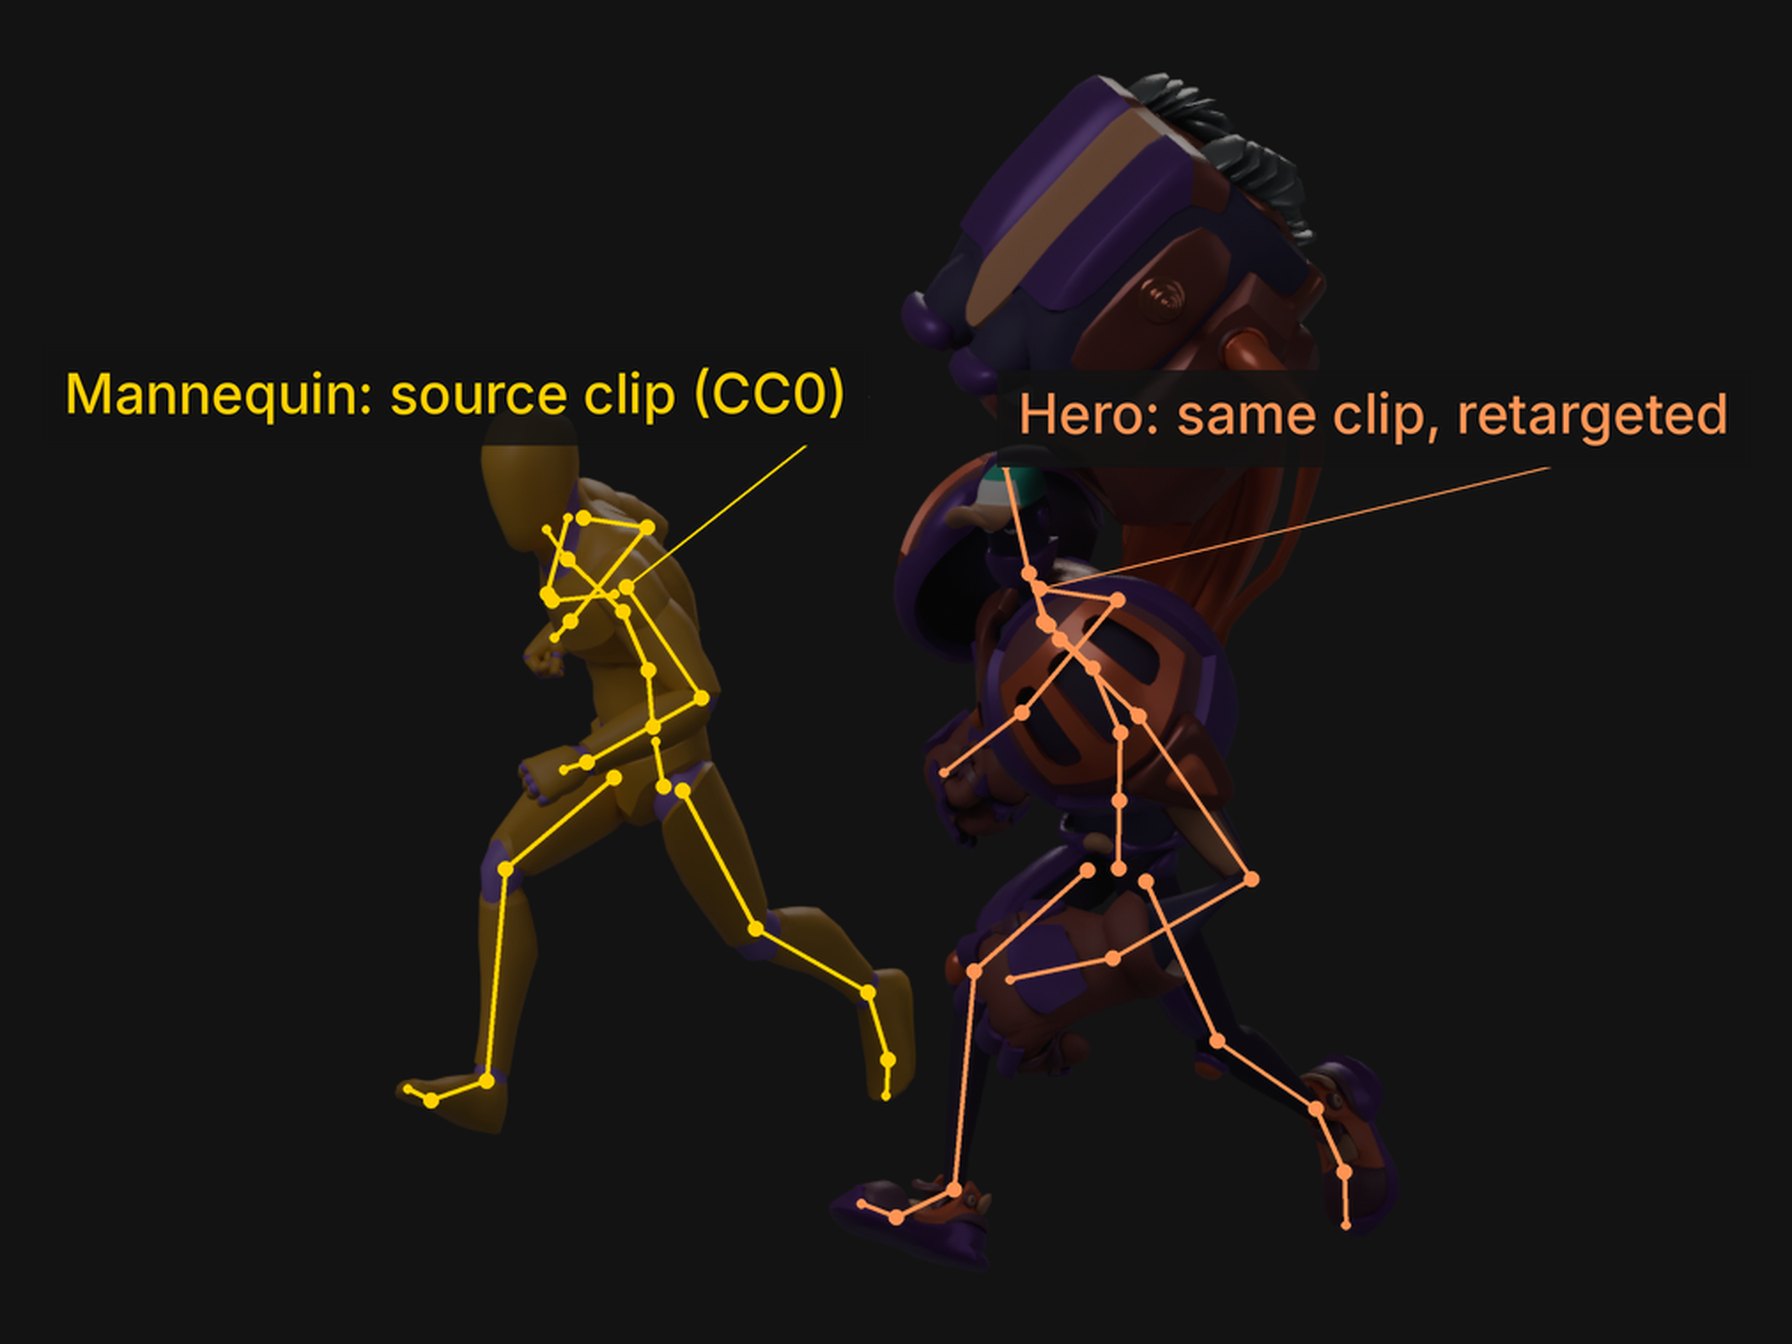 The same jog clip on the library mannequin (yellow) and on the hero
(orange), on matching frames.
Retargeting doesn't make the problems go away, it moves them. The hero's boots dip through the floor by up to ten centimetres in the jog, so he needs foot IK or a ground clamp. Clips where a human rolls, sits or lies down send the oven on his back into the floor, so those clips have to be made specially for him.
The Oven: A Second Character on His Back
The steam oven is a character in its own right, with its own face and its own rig of 41 bones. It hangs off a single mount bone on the hero's back. Inside the oven rig, one bone is the driver: the oven body. The support arch and the two hoses are short chains that solve toward targets parented to that body. Wherever the oven moves, the hoses stretch slightly to follow and never come unplugged.
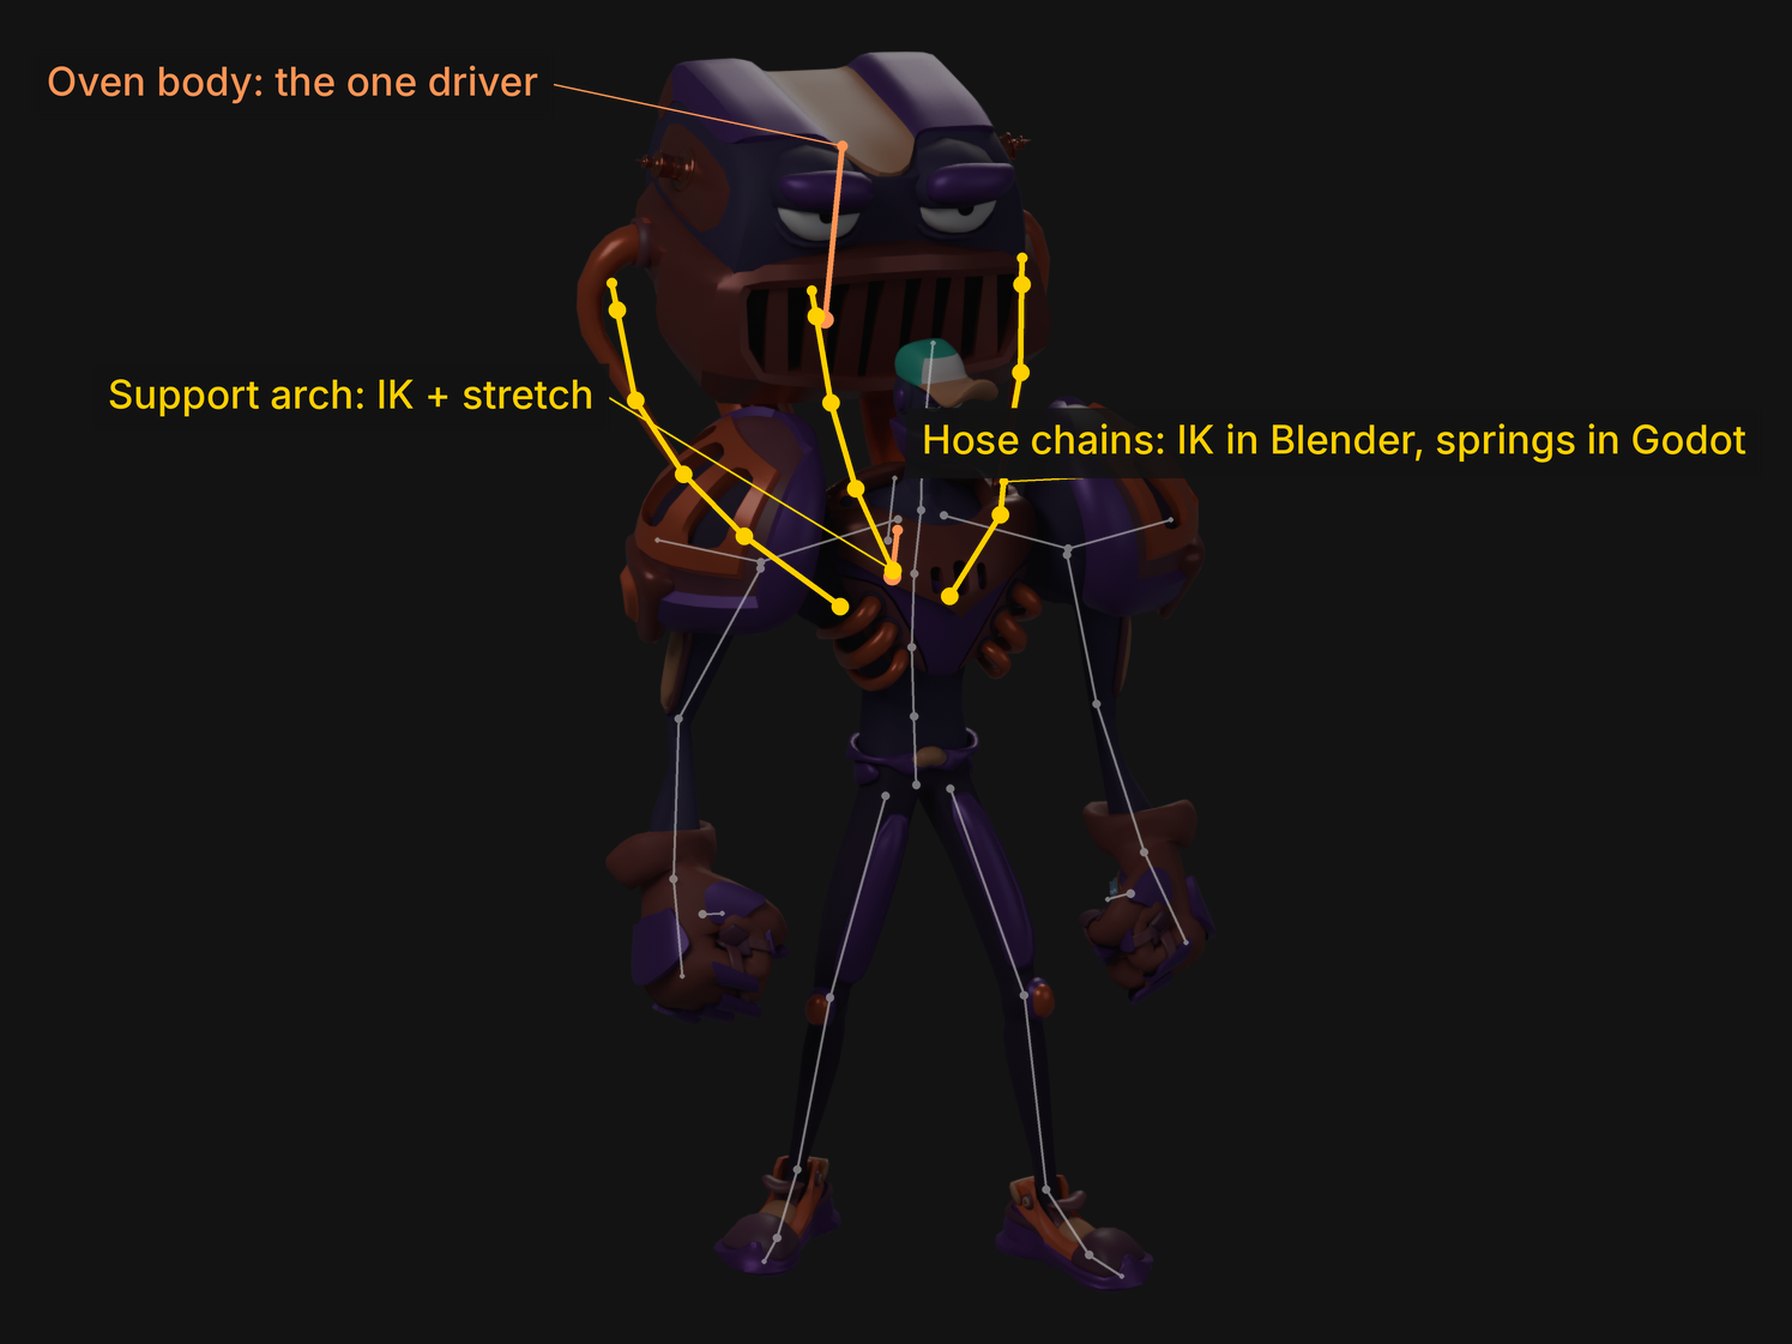 The oven rig on top of the hero's skeleton. The yellow chains are the
parts that can't be exported as they are.
That last sentence describes Blender. Inverse kinematics doesn't survive export to glTF, the format we use to bring characters into Godot. In every keyed clip the hose motion is baked into plain keyframes. For anything that happens at runtime, the plan is to rebuild the behaviour inside Godot: spring bones on the hoses and the arch, and Godot's own IK where the oven has to reach for something.
What Survives the Trip to the Engine
Every character above runs into the same boundary. Blender rigs are built from constraints, drivers and special bone types. The glTF format carries bones, weights and baked keyframes, and little else. The rig the animator uses and the rig the game plays are different things, and we stopped pretending they were the same.
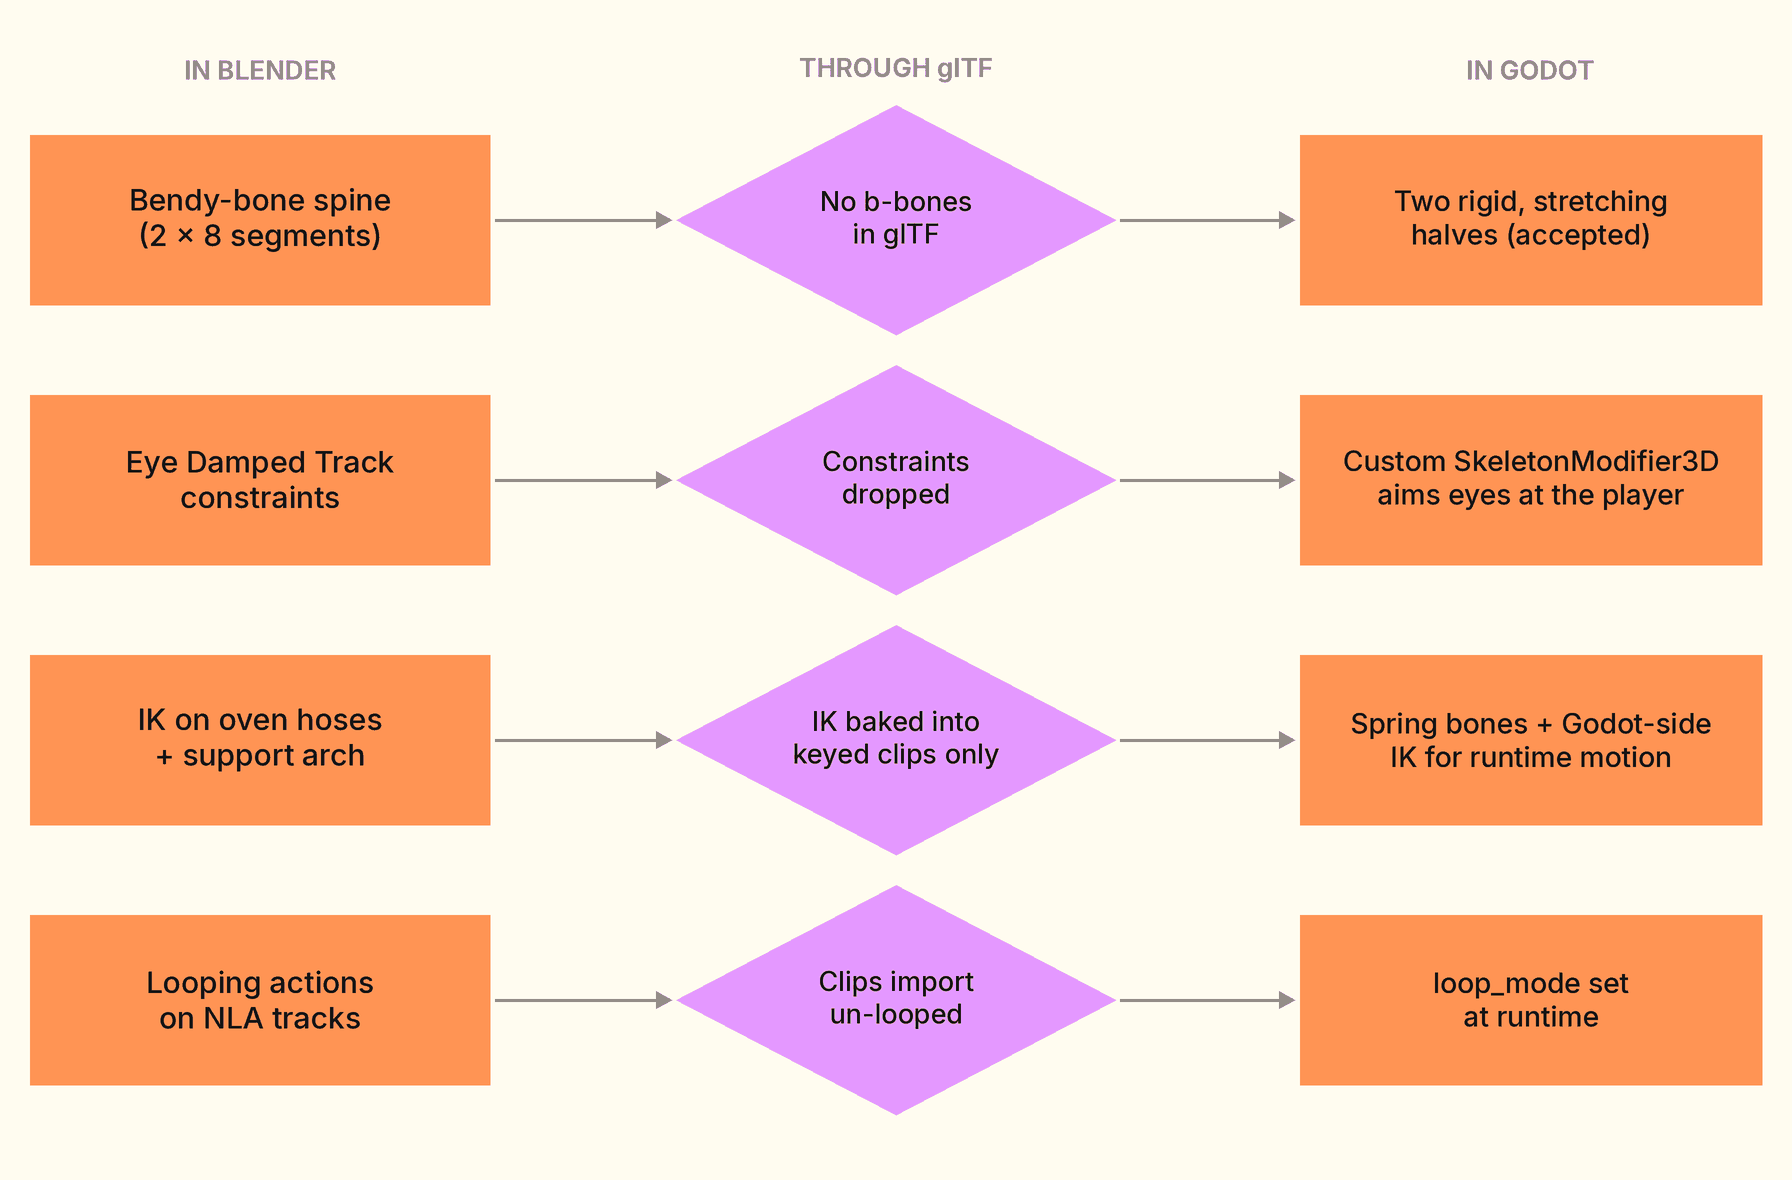 What gets lost on export, and what replaces it in the game.
Some losses we accepted. The rolling pin's smooth spine arrives in the game as two rigid halves that stretch, and at phone size, mid-run, nobody can tell. Others had to be rebuilt. The rolling pin's eyes lost their look-at constraints on export. A small custom skeleton modifier in Godot now turns them toward the player at runtime, so the rolling pin watches you run past.
What We'd Keep
MESH BEFORE WEIGHTS
Check for unmerged mirror doubles and negative scale before painting anything. Our worst deformation bugs were in the mesh, not the weights.
WRITE THE TRAPS DOWN
Misleading bone names and flipped sides are cheaper to document than to rename. Renaming breaks mirroring and every clip that already exists.
JUDGE POSES BY EYE
Axis reasoning produces confident mistakes. Render the pose, put it next to a sketch and decide in one look.
TWO RIGS, ONE TRUTH
Design for what survives export from the start. Keep the animator's rig rich and treat the engine's version as a translation of it.
None of these characters is finished. Next come the rest of the cast and the integration into the game. When those are done, there will be more to write about.